Ford Mustang GT 1996-2004: How to Adjust Your Clutch
Your mustang's clutch pedal is easily adjusted. So easy in fact, you might not even need tools.
This article applies to the Ford Mustang GT (1996-2004).
Your Mustang is equipped with a self-adjusting clutch from the factory. The factory's engagement point can be adjusted manually for further refinement of the clutch disengagement. Having the clutch adjusted properly is very important to the life of your clutch and transmission. If the clutch pedal is adjusted to disengage the clutch too soon, it may never fully engage when the pedals released, leading to a slipping clutch. If adjusted to disengage too late, the clutch may never fully disengage, creating difficulty shifting and damage to the shift forks/synchronizers. For those that race, aftermarket solutions are made to replace weaker factory clutch assembly components with metal versions.

Materials Needed
- Needle nose pliers
- Socket set (8mm-19mm)
- 3/8" ratchet
- Flat head screwdriver
There are three different ways to adjust the clutch disengagement point on your Mustang. The first two are relatively easy to perform, while the third requires the purchase of aftermarket parts.
Method 1 – "Lifting the clutch"
This method is described in your owner's manual. A copy can be downloaded here.
- Turn the engine off and shift into first gear.
- Put your foot under the clutch pedal and gently pull it up until the pedal stops.
- Push the clutch pedal down slowly. You will hear a click as the clutch adjusts itself.
If that doesn't do the trick, move on to Method 2.
Method 2 – Manually adjust the clutch pedal
Turn the engine off, engage the parking brake, and place the transmission into neutral. Move to a comfortable position under the dashboard to gain a view of the clutch pedal and its pivot point near the firewall. Move your head to the right side of the brake pedal and look up. You'll see the two plastic clutch adjustment pawls with teeth. These pawls are floating on the clutch pedal pivot shaft and held in place by metal clips. There is a plastic hook between the two pawls. This hook is apart of the large pawl.
Begin adjusting the clutch by pushing up against the hook. While holding the hook up, push the clutch pedal towards the firewall. You may hear the engagement pawls click as the pedal is pushed inwards. Most owners find one click is enough to re-gain sufficient clutch pedal position; although, two may work better for your needs. Release the clutch pedal to re-engage the pawls. The clutch disengagement should now begin close to the top of the pedal travel. If you heard more than two clicks during adjustment or unsatisfied with the adjustment, it can be reset by using the first method. Periodically repeat the process to ensure the engagement point remains set.
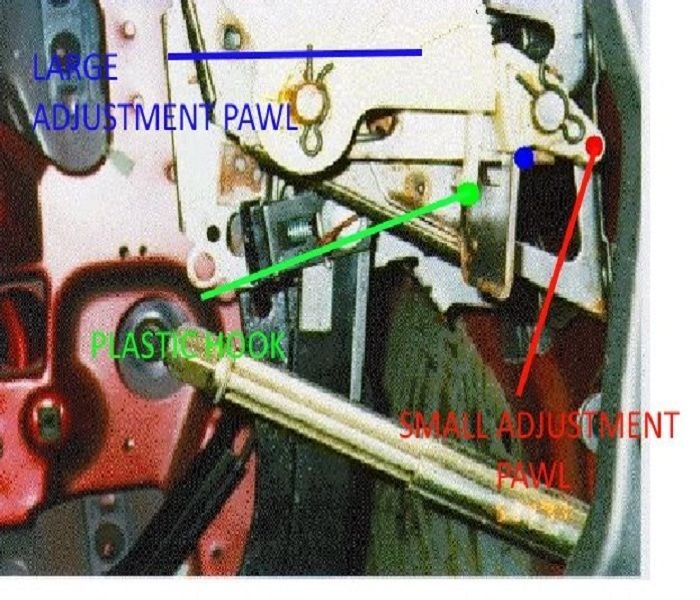
Figure 1. The clutch pedal adjustment components. 
Figure 2. The clutch and brake pedal assembly. 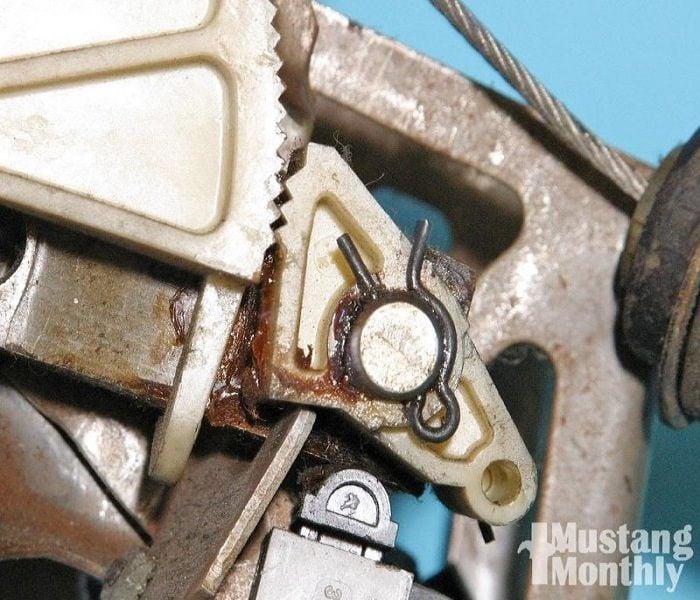
Figure 3. A close up of the engagement pawls.
Method 3 – Buy aftermarket components
Aftermarket companies have developed components to make the clutch pedal and cable assembly completely adjustable. They are considerably stronger than the factory versions as well. Steeda and UPR are commonly used companies that make complete clutch adjustment kits. You can purchase a Steeda clutch adjustment kit at here.
Related Discussions
- Clutch Release Point Adjustment - MustangForums.com
- How to Adjust Clutch - MustangForums.com
- Clutch Adjustment - MustangForums.com