Ford Mustang V6 2005-2014: Performance Diagnostic Guide
The electronic control units fitted to modern vehicles has allowed for many engine performance issues to be monitored and diagnosed with the use of a scan tool or code reader. Unfortunately, not all problems will trigger a fault code, so key components must be inspected the old-fashioned way.
This article applies to the Ford Mustang V6 (2005-2014).
A car suffering from performance and drivability issues can zap all the fun out of driving, as one has to constantly worry if the car will make it to its desired destination. In the case of the Mustang, enthusiasts expecting an involving driving experience from this sport-oriented vehicle will quickly notice a lack of power or rough running condition that hampers an otherwise impressive car. Fortunately, with modern electronics and gadgetry, most performance related issues will be detected by the on-board computer and record a diagnostic fault code to give a general idea of the potential problem area. That being said, some underlying performance issues are still able to sneak past the computers and make diagnosis a bit more in-depth. This article will outline several important components of the 2005 to 2014 Mustang that can limit engine performance.

Materials Needed
- Code reader or scan tool
- Digital multimeter
- Metric and American wrench and socket set
- Ratchet and extensions
- Screwdriver
- Spark plug socket
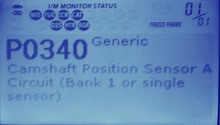
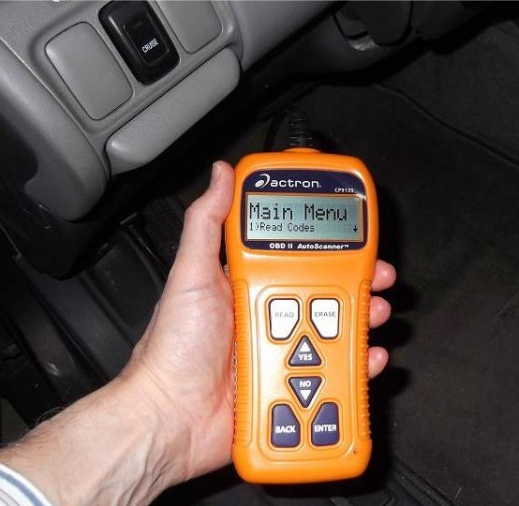
Step 1 – Scan for diagnostic trouble codes
The first step in diagnosing performance issues in any modern Mustang involves scanning the powertrain control module (PCM) for diagnostic trouble codes (also referred to as fault codes). The PCM uses various sensors fitted throughout the powertrain to not only allow for proper engine operation, but also ensures all measured values from these sensors fall within the specifications programmed in the PCM. Simply put, this powerful computer has the ability to detect when something is off kilter in the powertrain and can illuminate a check engine light as well as supply a fault code(s) to indicate the problem component.
By using a scan tool connected to the OBD-II port located under the driver's side dash, any active or stored fault codes can be retrieved. Depending on the type of scan tool, it may also be able to display freeze frame or live engine data to further aid in diagnosis. Having the fault codes on hand can typically point you in the direction of the faulty component.
Pro Tip
Fault codes can sometimes indicate an abnormal reading from a sensor and leave you inspecting related components. Do not discount a sensor failure as the culprit to your performance issue.
Step 2 – Check basic maintenance items
If no fault codes are present but your car is sluggish or lacking power, consider some of the basic maintenance items that may have been overlooked. Air, fuel, and spark are the key ingredients for combustion to occur; however, a restriction that limits the amount of any of these three things can effect how the engine runs.
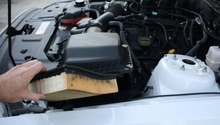
While seemingly irrelevant, a clogged or overly dirty air filter can minimize airflow to a point that the engine simply cannot breath in enough air to operate at its best. Reduced intake airflow will not typically trigger a check engine light, but you can bet that the PCM will adjust spark and fuel trims to compensate for the lack of air. Similarly, a restriction in the fuel filter may allow the car to run okay while cruising, but perform poorly when under a load (i.e. accelerating). The engine's fueling demands greatly increase as the RPM rises, so if your performance issue seems to only pop up under aggressive driving situations, the fuel filter may be clogged.
The final pieces of the basic maintenance puzzle to inspect are the spark plugs. Although spark plugs can last thousands of miles, it is not uncommon for them to experience premature buildup or excessive wear, especially in performance tuned applications. Reduced spark efficiency can result in incomplete combustion and cause rough idling, mild surging, or in severe cases, a misfire. In general, replacing these basic maintenance items, particularly if they are beyond their normal service interval, can have a profound effect on the general performance of the car.

Step 3 – Check fuel pump
Digging a bit deeper into a performance issue, a car with a failing fuel pump will experience many of the same problems associated with a clogged fuel filter. Stumbling under acceleration and a general lack of engine power are symptoms of a fuel pump that cannot maintain adequate fuel pressure to the fuel injector rail. Although fuel pumps tend to become noisy with a constant whine when they are on their last leg, Ford issued a technical service bulletin for early S197 models to address fuel pumps that were creating and ingesting air bubbles while cruising. These cavitation issues would see many owners experience fuel starvation problems after cruising at a steady speed for a few miles. Although many of these fuel pumps were replaced with an updated pump under warranty, there are still a large number of cars running around with the faulty pump.
Additionally, modern Mustangs are using a returnless fuel system that eliminates the use of a traditional fuel pressure regulator and relies solely on the fuel pressure sensor and PCM to deliver the required amount of fuel pressure. The PCM can adjust the pressure +/- 25% to accommodate for various modifications or a restricted fuel filter, but a new tune is typically needed if fuel system upgrades are installed.

Pro Tip
Do not discount a bad batch of fuel as the cause of engine performance issues. It is not uncommon for different octane fuels to get mixed up at a gas station or for fuel to become contaminated. Consider running a tank of quality fuel through the car to see if the problem clear up.
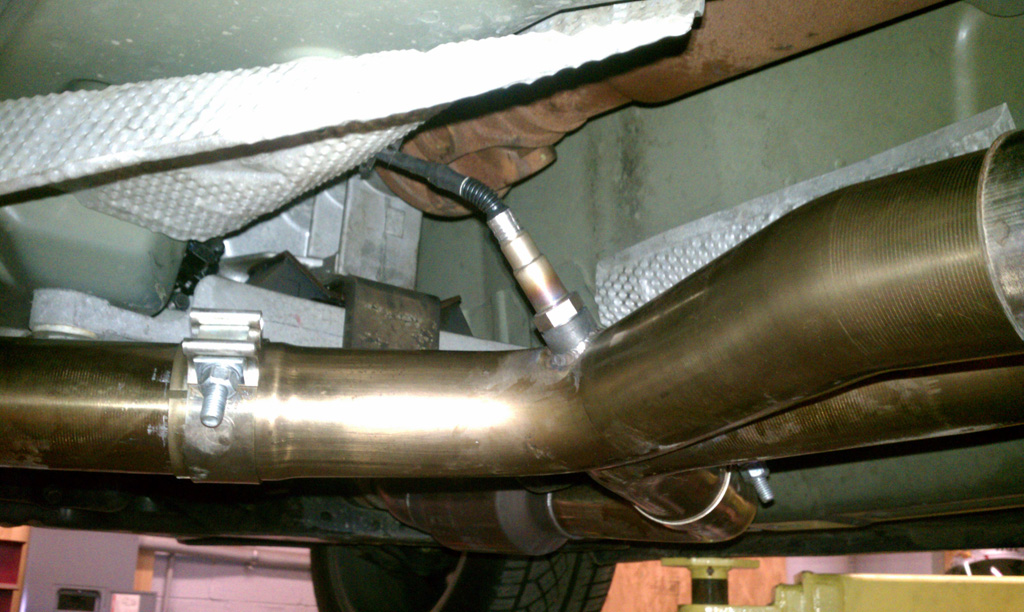
Step 4 – Check oxygen sensors
Modern fuel injection setups utilize a "closed loop system" that relies on the wideband oxygen sensors to provide feedback to the PCM for proper engine operation. In a nutshell, when combustion occurs, the oxygen sensors measure the exhaust gases to determine the actual air/fuel mixture. This information is then sent to the PCM where it makes various adjustments to fueling and ignition timing in an attempt to produce the ideal air/fuel mixture as programmed in the PCM mapping.
In short, properly functioning oxygen sensors are extremely important to the drivability and performance of any engine. If an O2 sensor fails, a check engine light and related fault code will surface. That being said, oxygen sensors tend to age and react at a much slower rate without completely failing. Although they may be able to function within spec and not trigger a CEL, an old oxygen sensor can cause engine performance issues because they are not able to quickly measure the air/fuel ratio to keep it in balance as good as a newer sensor does. Oxygen sensors begin to read slower at around 30,000 miles, and typically should be replaced between 50,000 to 60,000 miles to ensure the best performance.
Step 5 – Check ignition coils
The ignition coils multiply the low voltage from the battery into a high voltage burst of energy to fire the spark plugs. Whether your car has a coil pack, or coil-on-plug setup, the high voltage that passes through these components limits the usable life of the coils and requires a fairly short service interval. More often than not, cracks in the coil body develop and can allow the voltage intended for the spark plug to arc on nearby engine components. While the coil will still operate the spark plug, much of its energy is being wasted. Similarly, worn spark plugs can lead to premature coil failure as the increased resistance in the plug strains the coil. Many Mustang owners are replacing their coils every 30,000 miles and are reporting improved throttle response and a smoother running engine.
A quick visual inspection of the coils can typically indicate if they are the source of a drivability issue. Look for cracks, splits, or deterioration of any kind. Be sure to inspect the boot where it attaches to the spark plug as these can tear open and allow arcing to the cylinder head. As always, be sure all electrical connections to the coils and coil to spark plugs are properly engaged. If replacing coils, most experts recommend choosing OEM Ford parts as aftermarket coils have proven to be mediocre at best.

Pro Tip
If a coil fails outright, a misfire and subsequent check engine light will occur.
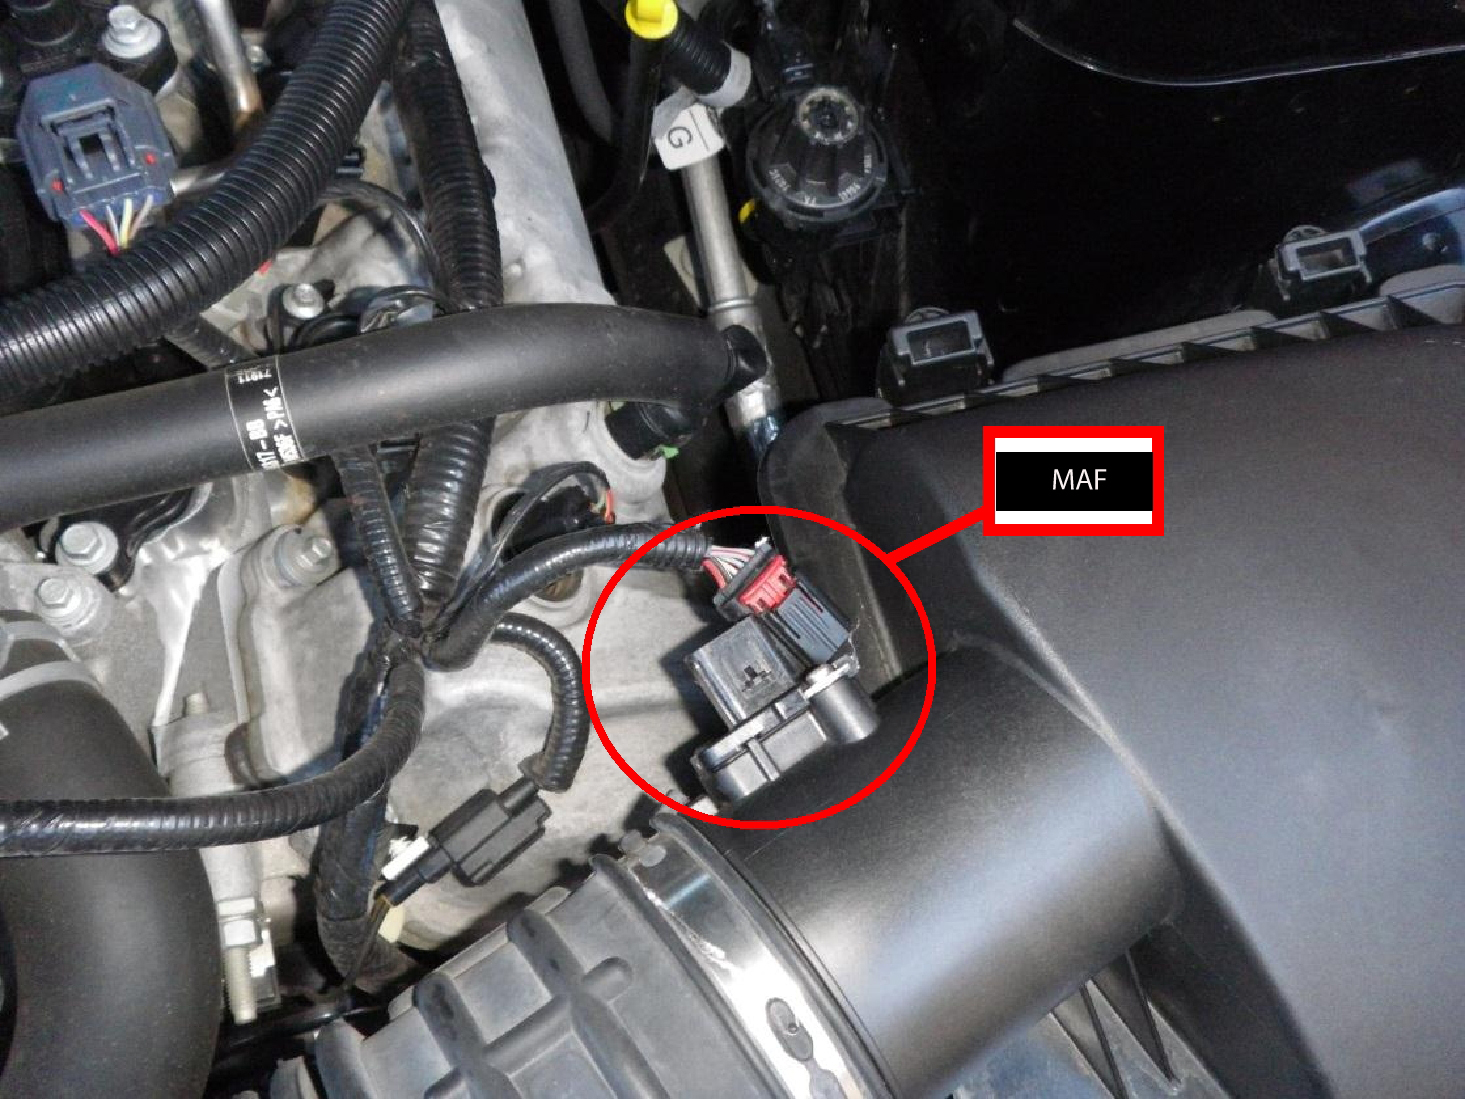
Step 6 – Check mass airflow sensor
The mass airflow sensor (MAF) is in place to signal to the PCM how much air is entering the engine at any given time. The Mustang utilizes a hot-wire MAF sensor that places a heated wire in the airflow of the intake tract. As air passes over the heated wire, it is cooled and the voltage change is sent to the PCM. The voltage measurement is interpreted by the PCM as the volume of air being ingested into the engine. The airflow measurements taken by the MAF works simultaneously with the oxygen sensors to ensure proper fueling for the engine. Unfortunately, the stock MAF has been known to act up when engines produce additional horsepower over the stock configuration or are fitted with aftermarket cold air intakes. Additional horsepower means additional airflow and, in some cases, the stock MAF cannot accurately measure this increased amount of air.
Heavily oiled air filters that are part of cold air intake kits can contaminate the hot-wire and cause improper readings. In either case, incorrect MAF readings can cause engine stumbling, hesitation, or high idle conditions. MAF issues should be taken seriously as improper or "pegged" readings can result in lean conditions and potential engine damage. Most handheld tuners with data-logging capabilities can allow you to monitor functionality of the MAF.
Pro Tip
It is important that there are no vacuum leaks behind the MAF, as any un-metered air entering the engine can result in a lean condition and potential performance issues.
Related Discussions
- Bad Fuel Pump? - MustangForums.com
- Cleaning the MAF and Throttle Body - MustangForums.com
- Fuse for O2 Sensor?- MustangForums.com