Ford Mustang V6 2005-2014: How to Replace Thermostat
If you need to replace your thermostat, luckily for you, this is a straightforward and easy job to do.
This article applies to the Ford Mustang V6 (2005-2014).
The thermostat is an integral part of the cooling system in your Mustang. It controls the flow of coolant through the radiator, and if it breaks, you might have an overheating issue. If you suspect that it is going bad, you will be so much better off taking care of it sooner rather than later. Thankfully, this is not a difficult job to do, and there aren't too many parts you need to remove to get to it. You also do not need any special tools, and it is removed and replaced remarkably easy. The thermostat is a very cheap part to replace, but if you don't feel up to doing this job on your own, expect to pay at least $250 on top of the parts to have a professional do it for you. Save yourself that cash and give this easy DIY job a shot.

Materials Needed
- Needle nose and channel lock pliers of various sizes
- 1/4" ratchet, 8mm swivel, deep well and 10mm sockets
- 3, 6 and 12" extensions
- Long and short handled 8mm box wrenches, adjustable wrench as well
- Various length flat head screwdrivers
- Plastic putty knife
- Appropriate anti-freeze for your vehicle
- Large catch basins for old anti-freeze
- Plenty of shop rags or towels
- RTV sealant
Warning
Be sure to dispose of all used anti-freeze responsibly and clean up any spill immediately, as this stuff is toxic to animals as well as pets.
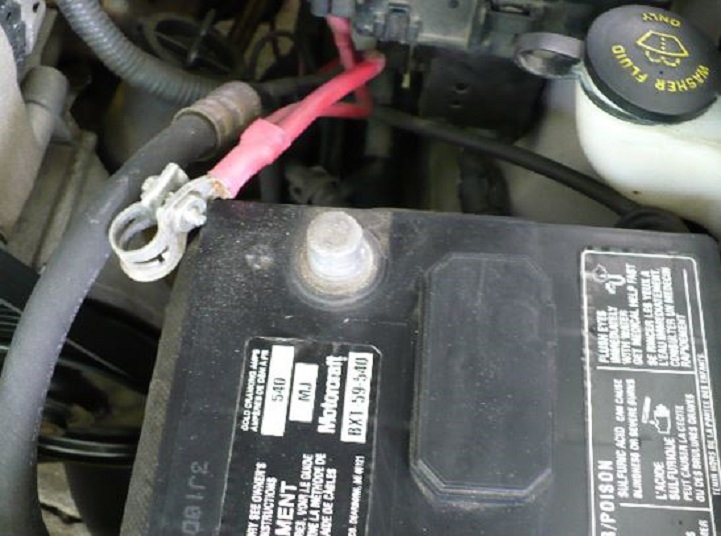
Step 1 – Disconnect battery
When working under the hood, it is always best practice to disconnect your battery first.
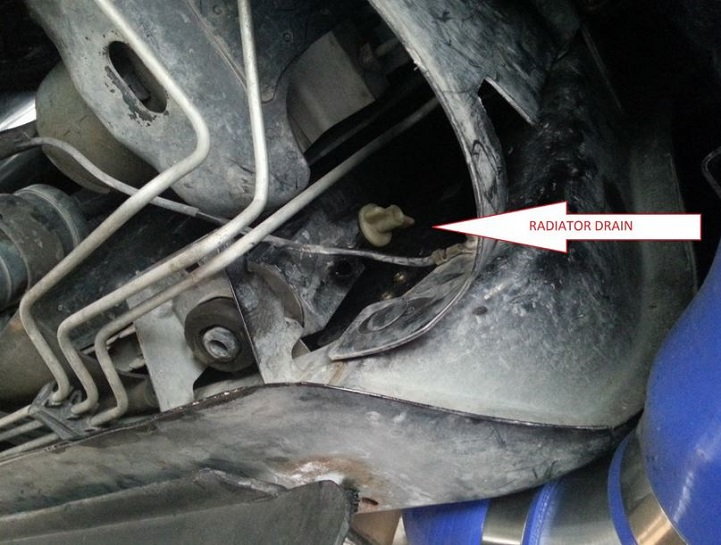
Step 2 – Drain the old coolant
You will need to drain the coolant before starting this job, or else you will have a real mess when you remove the upper radiator hose and get into the housing. You don't need to jack up the front end to do this, but it may help if you have trouble getting under the car. If you choose to jack it up, please use jack stands for safety and do not work under the car with just a floor jack holding it up.
- Look at the bottom of your radiator on the passenger's side. You should see a white plastic plug.
- The plug may be slotted for a flat head screwdriver, or it may have wings to remove it with just your fingers.
- Remove the radiator cap. (Make sure your engine is completely cooled first.)
- Position your catch basin under the drain plug, and then remove the plug. Be prepared for any spillage.
- Let the radiator drain completely.
Step 3 – Remove CAI intake hose and throttle body (optional)
It is a bit of a tight squeeze to get to the thermostat housing, but it can be done without removing these parts. It is well worth the time to make the room, as the intake hose and throttle body are simple to disconnect and set out of the way.
- If you have the throttle body (TB) cover still in tact, remove the three bolts holding it in place and then set it aside.

- Use a flat head screwdriver to loosen the hose clamps on both ends of the air intake hose.
- Remove the air intake hose and set it aside.

- Use an 8mm socket with a long extension to remove the four bolts holding the throttle body in place.
- Disconnect only the electrical connection.
- Place the throttle body up and out of the way, but do not disconnect it completely.

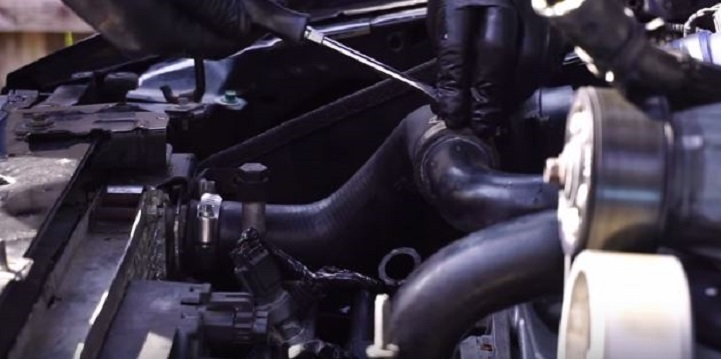
Step 4 – Remove the upper radiator hose
Using a pair of piers, carefully squeeze the hose clamps to remove the upper radiator hose from the thermostat housing. You should be able to swivel the hose out of the way without having to disconnect it from the radiator. If your hose is connected with another clamp, use a flat head screwdriver to loosen and disconnect it. You may have to loosen the other end to swivel it out of the way, but you shouldn't have to disconnect it entirely.
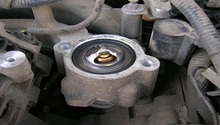
Step 5 – Remove the thermostat cover
There are three 8mm bolts that hold the thermostat cover in place. The use of the swivel 8mm socket makes this job much easier. Remove the three bolts and pull the cover off. You should now see the thermostat sitting in the lower housing unit.

Figure 7. Remove three bolts (one you cannot see) from the thermostat cover. 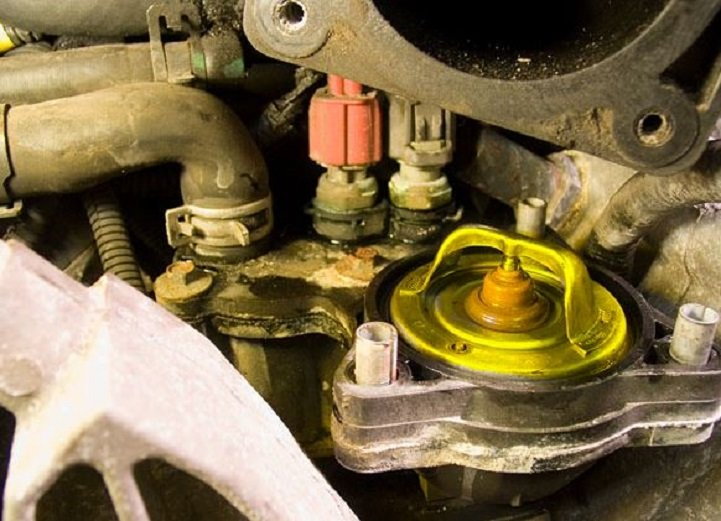
Figure 8. With the cover removed, you can see the old thermostat. It simply pulls straight up and out for easy removal.
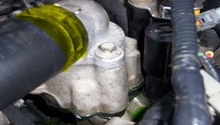
Step 6 – Pull the thermostat and its O-ring
With the cover removed, pull out the thermostat and the associated O-ring. Check the O-ring for condition and replace if needed. It's cheap insurance, so you may want to replace it anyway. Once the thermostat is removed, If your setup does not include an O-ring, you will want to coat the surface of the cover plates with RTV sealant. You will have to allow about an hour for it to cure. Set the new thermostat in its place, spring side down. If you have an O-ring, put it on the thermostat over the top first and then set it in place.

Pro Tip
To save yourself some heartache, place the new thermostat in very hot water before installing it to make sure that it opens up correctly. You will then be sure that you didn't get a bad one.
Step 7 – Put it all back together
After verifying that you had a good replacement thermostat and placed it in, your job is almost done.
- Replace the thermostat cover and tighten down the three bolts securely.
- Reconnect the upper radiator hose and tighten the hose clamp back down if you don't have the squeeze-type of connector.
- Be sure to tighten the hose on the radiator itself if you loosened it there.
- Re-attach the throttle body, secure the four bolts tightly, and re-connect the electrical connection.
- Re-connect the CAI hose on both ends, securing with the hose clamps.
- Replace the TB splash cover, tightening down the three bolts that hold it in place.
- Replace the radiator drain plug.
- Fill the radiator with a 50/50 mix of the approved anti-freeze and distilled water. Feel free to use the pre-mix, as well.
- If you have used RTV sealant, make sure the minimum required cure-time has passed.
- Start your Mustang and let it get up to operating temperature; you may want to give it some throttle to make sure that the T-stat opens.
- Turn your heater on the highest heat setting and the blowers on high.
- If your gauge bounces or you get no heat, you may need to bleed the cooling system using the bleeder valve to get rid of any air bubbles that may be trapped in the system.
- Check for leaks and go for a test ride.

Featured Videos: V6 Thermostat Replacement
-
Thermostat Housing Replacement
-
05+ Thermostat Install
Related Discussions
- How to Replace Upper and Lower Thermostat Housing - BenGrosser.com
- Finally Replaced Leaking Thermostat Housing - MustangForums.com
- Thermostat Replacement? - MustangForums.com
- Changing Thermostat - MustangForums.com