Ford Mustang V6 1994-2004: How to Replace Spark Plugs
Don't overlook changing your spark plugs at the recommended intervals, even if they seem to be working fine.
This article applies to the Ford Mustang V6 (1994-2004).
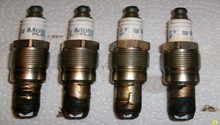
Changing your sparks plugs is one job that many folks shy away from, but it doesn't have to be a job to automatically consider a pro to do. In today's compact engine compartments, many plugs are difficult to get to, but they aren't impossible. It is not much different with a Mustang engine. There is one plug on the V6 that is tricky to get to, but if you have the right tools and some patience, you can change them out yourself. You can purchase replacement plugs at just about any auto store at various price points. Just as many folks will swear by platinum, as will tell you to stay away from platinum plugs. Whichever you choose, just be sure that they are the correct size for your car and that they are gapped correctly according to Ford. You may have a sticker under your hood that will give you the correct gap size for your engine. Having a professional do the job for you might be easier on your time, but certainly not on your wallet. If you want to save yourself a considerable amount of cash, consider trying this job on your own.

Materials Needed
- Ratchet with various sized extensions
- 8mm wrench
- 5/8 sockets and a spark plug socket
- Flat head screwdriver
Step 1 – Disconnect the battery
Open your hood and secure it with the rod. It is always a good idea to disconnect your battery whenever you are working in the engine compartment.

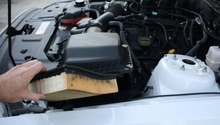
Step 2 – Remove the airbox
While this job isn't the most difficult, you can make it easier by giving yourself some more room to work. Removing the air box is pretty straightforward and simple. One 8mm bolt and a flat head screwdriver should do the trick. The 8mm screw attaches the front-left side of the airbox to the frame, and the rear of the airbox is attached with a flat head screwdriver on a host clamp.

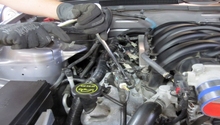
Step 3 – Replace the passenger's side plugs
The first two plugs toward the front on the passenger's side are relatively easy to remove. You'll want your spark plug socket, a really long extension and a ratchet to get the job done. It is easiest to have the socket attached first and guide it into the plug hole. Simply remove the plug wire boot, then the old spark plug, and replace it with a new plug that is correctly gapped. Do this for the first two plugs toward the front of the car on the passenger's side. You can see the necessity in removing that airbox to give you the room you need to work. When you install the new plugs, put them slightly in the socket first; not all the way in, but just enough that it stays put. Gently place it into the plug hole and start it by hand until it is snug. You do not want to cross-thread the new plugs in the hole, or else you will have a major job to fix that issue. Once it is hand-tight, attach your ratchet and give it another 1/2 to 3/4 turn. Do the same for the rear most plug closest to the firewall. This plug is the most difficult to get to, but it can be done with a little more patience.

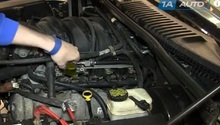
Step 4 – Replace the driver's side plugs
All of the plugs on the driver's side are easy to replace. You only need the ratchet and the socket; no extensions are necessary for these. Replace one at a time, so you won't have any worry about getting any of the plug wires out of order. Pull off one plug wire boot, and remove the plug using your ratchet as well as the plug socket. On this side, you should be able to replace the plug with just your hands, being careful to start the plug and then hand-tighten only. Once it is snug, again, only about 1/2 turn with the socket is all the tightness you need to install the new plug. Make sure all these plugs are correctly gapped, as well.

Pro Tip
As you are replacing your plugs, visually inspect your plug wires for wear. Look for arcing marks or cracking, and replace if necessary. It is also a good idea to inspect the old plugs to discover if your engine is running too hot and dry, or too lean.
Step 5 – Reinstall the airbox assembly
Once you have your new plugs in, be sure to securely reattach the airbox assembly. Set it back in place and secure the rear host clamp first, as this will give you the play you may need to seat it properly. Make sure that you have a really good seal before tightening down the host clamp. Once that is done, replace the 8mm bolt that holds the front of the airbox to the frame.

Pro Tip
Now is a good idea to pop the latches on the airbox and remove the old air filter to visually inspect it. Replacing the air filter is simple and will ensure a long life of your engine, so spend the extra few bucks on a new one.
(Related Article: How to Replace Air Filter - MustangForums.com)
Step 6 – Reconnect battery and give it a start
Once you are done with the job, reconnect your battery and start up your car. Make sure that it sounds normal, as well as no misfires and no CELs are illuminated.

Featured Video: How to Replace Spark Plugs on V6 Mustang
Related Discussions
- Spark Plug Wire Order - MustangForums.com
- Spark Plugs Easy to Replace? - MustangForums.com
- Motorcraft Platinum Spark Plugs? - MustangForums.com