Ford Mustang GT 2005-2014: Performance Diagnostic Guide
Many issues can be remedied with a simple diagnosis, while others may be a bit more involved.
This article applies to the Ford Mustang GT (2005-2014).
You may run into various issues with your Ford Mustang that can manifest themselves in many different symptoms. Learn what could be the cause of the issues you are experiencing before turning your car over to a professional. Properly diagnosing the problem could give you the opportunity to fix it yourself, or at worst, keep you from spending a ton of money at the shop while they throw parts at the problem hoping one will stick. Learn how to diagnose some of the more common problems, as well as the more complex, to save yourself some time, aggravation and money.

Materials Needed
- Ratchet and socket set
- Flat head screwdriver
- Replacement spark plugs and coil packs (if needed)
- Replacement fuel filter or injectors (if needed)
- Replacement serpentine belt (if needed)
- Replacement air filter (if needed)
- Transmission fluid
- Antifreeze
- Catch basin
- New radiator cap (if needed)
- Multimeter
- Toothbrush and a good quality throttle body cleaner
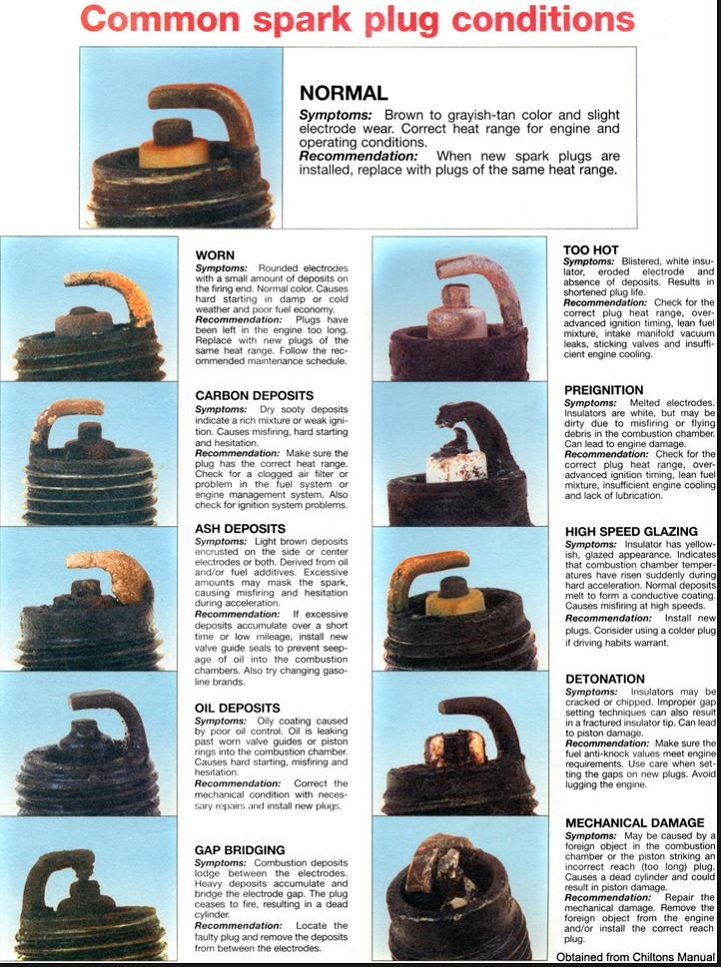
Step 1 – Check your spark plugs
They might be misfiring.
Your spark plugs may have gone bad. Their condition can tell you a lot about what is going on with your engine.
- Pop the hood and look on the left as well as right-hand side on top of your engine block.
- You will have six or eight of them depending upon your model.
- Pop the plug wires off the top of each plug. You may want to do one at a time to avoid crossing the wires.
- Use a spark plug socket to remove each plug.
- Check the condition of the bottom of the plug for color, wetness and gap size. Replace if bad.
- A very wet plug can indicate a gasket leak, while a very dry and ashen plug end indicates your engine is running way too hot.
If your plugs are in good condition and you are still experiencing misfires or rough running, take a look at your coils.
(Related Article: How to Replace Spark Plugs - MustangForums.com)
Step 2 – Check your ignition coil packs
They may be bad or have a loose connection.
Your ignition coils are the coil over plug type, which means that each spark plug has its own ignition coil. This is a much more efficient way of firing the plugs and much cheaper to replace than a single ignition type coil found in older model vehicles. Each COP is located next to its particular plug.
- Pop the hood and find the coil packs right next to the spark plugs.
- Check each wiring harness connection that is associated with each coil pack. If they are loose, tighten them and recheck that your engine is running.
- If each wiring harness is securely fastened, then squeeze the sides and disconnect the wiring harness.
- Use an 8mm socket and remove the bolt holding the COP in place to the engine.
- Pull out and simultaneously turn the coil pack to remove it completely from the engine.
- Check the condition of the coil pack and replace as needed.

If the ignition coils aren't the problem, take a look at the air filter.
(Related Article: How to Replace Ignition Coils - MustangForums.com)
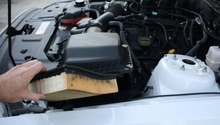
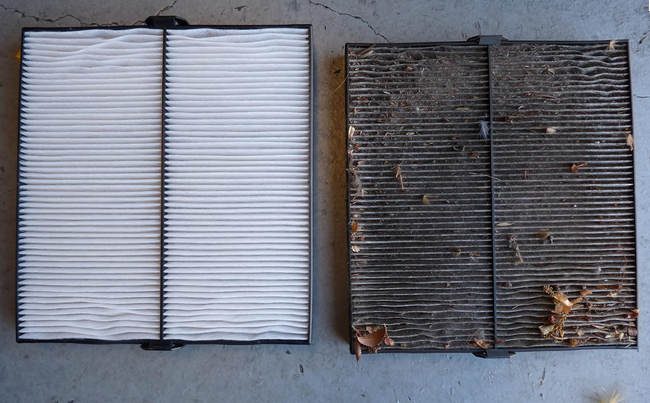
Step 3 – Clean or replace air filter
Your engine might be starved of oxygen.
If you have a re-usable air filter, give it a good cleaning and re-oiling. It may have excessive dirt that could be restricting air flow and causing hesitation.
If the air filter doesn't solve your hesitation problem, consider replacing the PCV valve.
(Related Article: How to Replace Air Filter - MustangForums.com)
Step 4 – Replace your PCV valve
A bad PCV valve will cause a problem with the vacuum.
The PCV valve siphons moisture and blow by vapors from the crankcase, and then puts them back into the intake manifold to be burned off by the engine. When the PCV valve is bad, these vapors and moisture can create sludge from oil contamination and buildup in your engine, causing really poor performance. A new PCV valve is really inexpensive, so go ahead and change it out and it just may solve your problem.

If you still suffer from hesitation or lack of engine power, you may have a vacuum leak elsewhere.
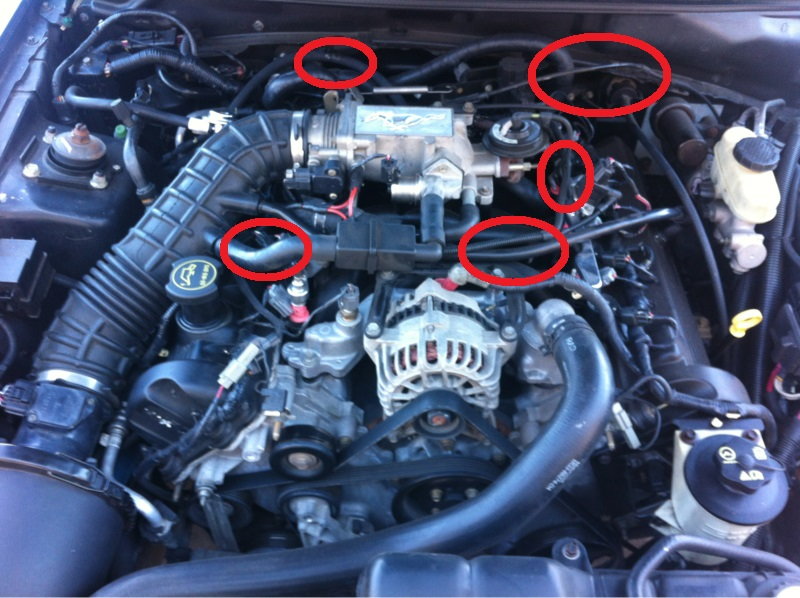
Step 5 – Check your vacuum lines
Vacuum lines are made of rubber and can crack over time, creating leaks that can cause hesitation in your engine.
The vacuum lines in your Mustang are located near the throttle body. There are three that you need to take a closer look at for cracking or wear. The cracks will most likely be near the ends where they are seated into the engine or manifold. The high heat and cold fluctuations will cause these lines to become brittle over time, which will cause leaks that starve your engine and cause it to hesitate or idle very rough. These lines are not too expensive and pretty easy to replace on your own.
If your vacuum lines look good, it is time to move on to little more difficult items to check.
Step 6 – Take a look at your alternator
The alternator may be starting to go bad, which can cause poor startup conditions and reduce battery life.
The alternator is often overlooked as a source of problems until it really starts going bad. If you have a good battery but it's dead or the car won't start, you may have an issue with your alternator. If you give it a good whack with a hammer and the car subsequently starts, it is time to replace it. Otherwise, get a multimeter and test the output of the alternator to make sure that the specs are correct or not, and replace.

If the alternator is good but you still have tough starts or hear any kind of squealing, it may just be the serpentine belt.
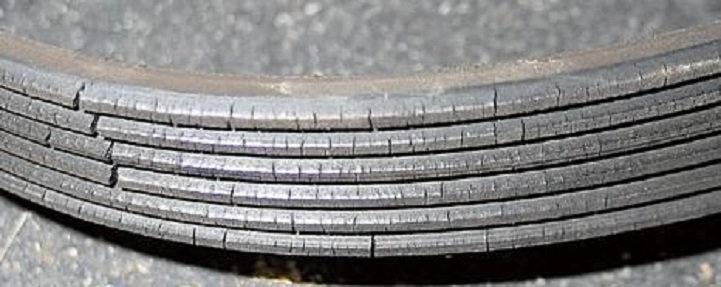
Step 7 – Inspect your serpentine belt
The serpentine belt may be worn or cracking and slipping on the pulleys.
The serpentine belt wraps around several pulley, including the alternator and water pump. If the belt is slipping, it can cause the pulleys to not turn enough, creating many different issues that range from overheating to not starting or rough idling and making a loud chirping or squealing sound. Check that the teeth of the belt are good and solid; also, check that there are no hairline cracks on either side of the belt. Put a long handled ratchet on the tensioner pulley and push down to create enough slack to slip the belt off over the alternator pulley, then remove it. Replace if needed. Make sure you follow the correct routing path when replacing.
If your belt looks good, it may be time to clean the throttle body.
Step 8 – Consider cleaning out your throttle body
The throttle body is susceptible to carbon buildup, which will cause rough running, hesitation and generally, poor performance.
The throttle body isn't too difficult to remove and clean. You will want to get a good quality cleaner and a toothbrush to give it a good cleaning. Make sure that you mash the gas to get it opened up and really get in there in order to clean it out. You should really notice a big difference after performing this procedure.

If a good cleaning didn't do the trick, you may have a bad fuel filter.
Step 9 – Consider replacing the fuel filter
The fuel filter may be excessively dirty or even clogged, which will cause poor idling, stalling, hesitation and very poor performance.
The fuel filter is not a difficult item to replace. You do not need to drop your tank, but you will need to jack up the rear end of the car. Crawl under the rear end and look just behind the rear axle. You'll find the small canister mounted underneath and a simple quick release connector will pop the filter from the fuel line. A flat head screwdriver on the clamp will pop that old filter right out. Replace with a quality OEM replacement. Your car should start right up and be back in normal operations if you had a bad one causing all your problems.

Featured Video: How to Replace Fuel Filter
If the new filter didn't solve the problem, then you may have to consider replacing the injectors.
(Related Article: How to Replace Fuel Filter - MustangForums.com)
Step 10 – Replace the fuel injectors
They might be bad, which will starve your engine of fuel and cause almost the same symptoms as a bad fuel filter.
Fuel injectors can become heavily clogged with carbon buildup. If the condition has been there a while, a good cleaning may not do the trick. Cleaning or replacing the injectors may not be a job for a novice DIYer. If you have ruled out everything else, it may be time to take it to a pro to have these checked. If you have decent mechanical skills, this is something that you can do on your own in your garage and save yourself some considerable money by not having a pro do the job.

If your car is overheating, you may have a cooling system problem.
Step 11 – Inspect the cooling system
Bad cooling system or lean running can cause overheating.
There are a myriad of issues that can cause your engine to run hot. Don't automatically assume you need a new or a bigger radiator. If you have already checked the air filter or CAI system, you can rule this out.
- Check your radiator cap. Consider replacing anyway.
- Pressure check your cooling system through the radiator cap.
- Check the upper and lower radiator hoses for leaks or cracking, paying special attention to the areas before and after the clamps.
- Check the electric fan wiring with a multimeter.
- Make sure that you have the correct amount and type of coolant for your vehicle.

If your problem is with the transmission, there are a few things you can do on your own to help with diagnosing before taking it to a pro.
Step 12 – Inspect your transmission fluid
Draining the transmission fluid and inspecting it can tell you a lot about what might be happening.
A transmission flush may solve your problem with your transmission. Low tranny fluid can cause a lot of internal issues. Before just adding more, you may want to drain and inspect it first.
- Drain your transmission fluid into a large catch basin.
- Inspect it for coloration and smell. If it smells burnt, you may have some internal problems.
- Run a magnet through the old fluid and see if you have large chunks of metal or other metal debris. Small shaving do not necessarily indicate internal problems.

(Related Article: How to Change Automatic Transmission Fluid- MustangForums.com)
Related Discussions
- 2000 GT, 4.6 Low RPM Hesitation Misfire Skip PROBLEM SOLVED! - MustangForums.com
- 2005 GT Overheating Problems - MustangForums.com
- Mustang GT 2006 Automatic Transmission Problems - MustangForums.com
- What to Look For in a GT - MustangForums.com
- 1994 Mustang GT problems. Possibly Mass Airflow Sensor? - MustangForums.com
- How to Change Fuel Filter Mustang GT - YouTube.com