Ford Mustang GT 1996-2004: How to Change Automatic Transmission Fluid
Automatic transmission fluid is used for many purposes inside your transmission, such as cleaning, shifting, and cooling. It's very important the fluid remains clean, or wear can quickly occur. Check your fluid level and condition every 30,000 miles.
This article applies to the Ford Mustang GT (1996-2004).
Automatic transmission fluid is pumped into the many passages inside the transmission once the engine begins to run. The fluids creates a film around gears to reduce friction and is channeled to solenoids for gear changes. Multi-plate clutches use the fluid for cooling and clamping force. Automatic transmissions are machined with very small tolerances between valves. Even very small amounts of dirt can damage valve body cylinders, reducing gear shift efficiency.
Materials Needed
- 3/8" ratchet
- 1/2" ratchet
- 10, 11, 12, and 18mm sockets
- 6" 3/8" extension
- Flat head screwdriver
- Torque wrench (10 ft. lbs.)
- Drain pan
- Rubber gloves
- Safety glasses
- Fluid funnel
- Transmission filter and pan gasket
- Mercon V transmission fluid
- Pry bar (optional)
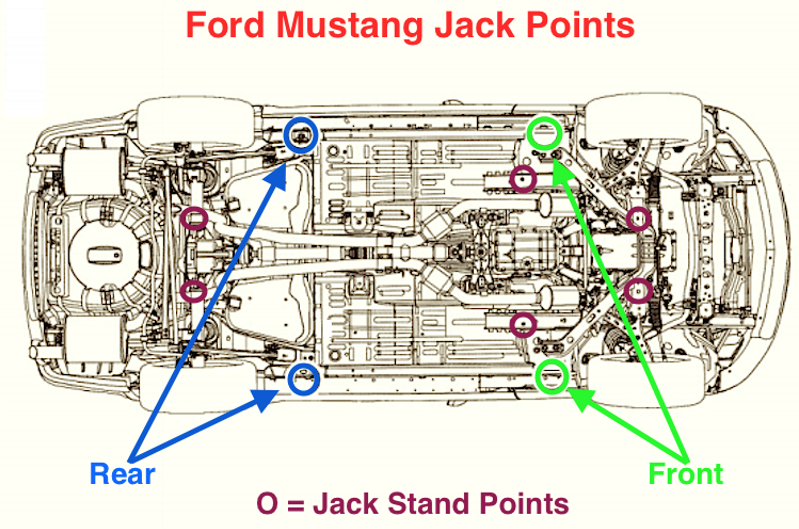
Step 1 – Raise and support the vehicle
The vehicle needs to be leveled or on a level surface for an accurate reading. Engage the emergency brake. Position the floor jack below one of the jacking points on the front of the vehicle. Once your desired height is achieved, place a jack stand as close to the jacking point as possible. Repeat this procedure for the other corners. Blocks of wood can be placed between the jack stands and body to reduce the chance of damage.
Step 2 – Remove the transmission fluid pan
Place a drain pan beneath the fluid pan. Using a 10mm to 12mm socket (whichever fits best) begin removing the fluid pan bolts. Start at one of the rear corners. You want to remove the pan corner by corner to make it easier for the fluid to reach the drain pan. If the pan is stuck to the transmission, carefully use a pry bar to separate them. Do not scratch the mating surfaces between the pan and transmission.
Step 3 – Drain the torque converter
Remove the rubber plug on the bottom of the converter housing. Use a small flat head screwdriver or pick to pry it out. Place your drain pan beneath the plug opening. While turning the crankshaft bolt clockwise with an 18mm socket (in front of the harmonic balancer), feel for the 10mm to 12mm torque converter drain bolt directly above the plug opening and remove it. Once the fluid slows to a drip, reinstall the drain bolt by turning the bolt until snug.
Step 4 – Install the new fluid filter
The transmission filter is visible once the pan is removed. Depending on the style of filter, it may press into holes of the transmission using rubber seals or bolted to the transmission. Compare the new filter with the old one, looking for bolt hole locations to determine which style you have. Twist and pull the filter away from the transmission to remove it. Rub some new transmission fluid on the new filters rubber plugs before installation. Tighten the bolts on the filter (if required) until snug.
Step 5 – Install the transmission fluid pan
Some rubber gaskets can be re-used; although, it is good practice to replace the gasket. Pry the old gasket off the pan. Use a solvent, such as brake clean and a plastic gasket scraper, to remove any leftover old gasket material. Place the new gasket onto the pan and position the pan against the bottom of the transmission. While holding the pan, install four bolts (one at each corner of the pan). Tighten them by hand, making sure the gasket stays lined up with the holes. Install the remaining bolts by hand. Tighten the bolts in a sequence, starting at each corner and working your way towards the middle. Tighten these bolts to 10 ft. lbs.
Step 6 – Fill the transmission
Locate the transmission fluid dipstick. It is on the driver's side of the engine. Some are near the brake master cylinder. It will have a yellow or black handle. Remove the dipstick and place a funnel into the tube. Pour 13.9 quarts of Mercon V automatic transmission fluid into the transmission if you drain the torque converter. Pour 4.3 quarts in if you didn't.
Step 7 – Check the fluid level
Install the dipstick and let it sit for a couple of seconds. Remove the dipstick and confirm the fluid level is near the cold fill mark (lower line). Adjust the fluid level as required. Start the engine and place your foot on the brake. Cycle through each gear (park, reverse etc.) for several seconds each and repeat the process as you return to park. Let the engine run for twenty minutes. You want the transmission to be at its operating temperature of 170 degrees Fahrenheit. Check the fluid level once again, confirming the level is near the transmission hot fill line and adjust until the correct level is obtained.
Related Discussions
- ATF Change - MustangForums.com
- Which Type of ATF - MustangForums.com
- How Often Should You Change Transmission Fluid - MustangForums.com