Ford Mustang GT 1996-2014: Brake Diagnostic Guide
Are your brakes not performing as well as they once were? The brake system is a complicated system and a lot can go wrong with it. Learn how to diagnose the brakes in your Ford Mustang GT here.
This article applies to the Ford Mustang GT (1996-2014).
The brake system in the Ford Mustang GT is a pressurized system that works with both pressure and friction. Since this is the hardest working system in your car, a lot can wear out and more can go wrong. Diagnosing the issue in your brakes is quite simple, and with this guide, you will be able to get to the bottom of the problem to know exactly what you need to do to retain your brake's feel as well as performance. Depending on the signs, the issue could be the brake pads, rotors, calipers, lines, or even the brake booster. Don't feel intimidated though, we will break it down for you and discover the source of the issue.

Materials Needed
- Flashlight
- Brake fluid
- Assistant
- Jack and jack stands
- Tire iron
- 13mm wrench
Step 1 – Check brake pedal feel
Is it spongy?
Your brake pedal can tell you a lot about the issue. If the brake pedal feels spongy, then that means you have air in your brake system. Which also mean there could be a leak somewhere that caused air to get into the system. Use your flashlight to look for brake fluid around the calipers where the brake line connects with it. Follow the brake lines to find the leak.
To resolve the brake pedal feel issue, you will need to bleed the brakes. This process can be done at home with the help of a friend. You will need to connect a hose to each caliper's bleed valve, starting from the passenger side's rear, driver's rear, passenger front, and end with the driver's side front. Connect the other end of the hose to a bottle, ask a friend to pump the brake pedal a few times, then keep the pedal pressed. Loosen the bleeder valve and let the fluid drain; as soon as you stop seeing bubbles in the fluid, tighten the bleeder valve before the friend releases the brake pedal. Repeat the process for each caliper while refilling the brake reservoir in between.

(Related Article: How to Bleed Your Brakes - MustangForums.com)
If the brake pedal feels normal, proceed to Step 2.
Step 2 – Check brake pads
They could be worn.
The brake pads need replacement often since they clamp and use friction to make your car stop. The beginning signs of worn pads start with a tiny squeak, as the car is coming to a complete stop. As time goes by and as it gets more worn, the squeak starts getting louder and starts as soon as you touch the brake pedal. To resolve this issue, just simply replace the brake pads.
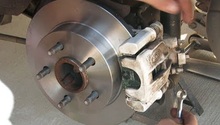
Loosen the lug nuts on your wheel, raise your Mustang and secure it on jack stands. Remove the wheel, and unbolt the two bolts on the back of the caliper: one is located on top while the second one is located on the bottom. Check the brake pads for proper thickness. The minimum thickness on your pads should be no less than 1/8" to 3/16", counting from the friction part after the metal.
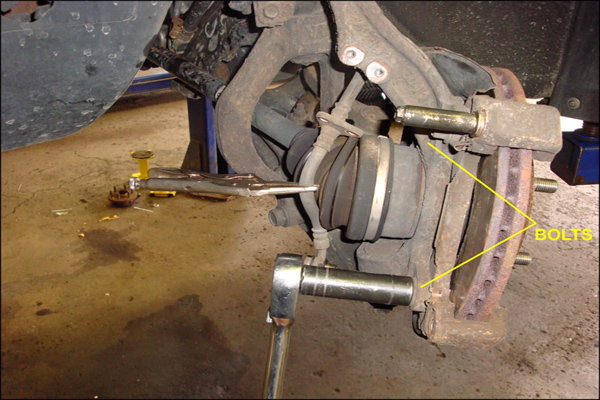
Figure 2. Caliper bolts to remove caliper. 
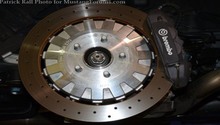
Figure 3. Thick vs thin pads.
If your pads are thick enough, move on to Step 3.
Step 3 – Check the rotor
It could be worn, cracked, or rusted.
With the wheel and caliper off, check the brake rotor for any grooves, cracks, or rust. Any of that can cause grinding and squeaking noise when breaking. Your rotors should be smooth for maximum stopping power. If you discover grooves or cracks, replace your rotor and the sound should go away shortly after you break the new one in.
Simply tap the old rotor with a rubber mallet to wiggle it; when it gets loose, pull it out all the way. Install the new one the same way.
If your rotor are fine, proceed to Step 4.
Step 4 – Check the calipers
They could be sticking.
If your car feels like it's not moving smoothly, along with noises coming from the wheels, your calipers could be sticking. Even though this is rather rare to happen, when it does, you need to replace the sticking caliper, and it's recommended you replace the one across from it. If the caliper is sticking, its pistons will be clamped on the rotor and cause constant friction.
To replace the caliper, remove the two bolts holding the caliper in place, then remove the banjo bolt connecting the brake line to the caliper. Connect the brake line to the new caliper and tighten its two bolts. You will need to bleed your brakes after this procedure.

Related Discussions
- Locking and Dragging - MustangForums.com
- Caliper Piston Issues - MustangForums.com
- Rotor Issues - MustangForums.com