Ford Mustang V6 and Mustang GT 1994-2014: How to Repair Scratches
Don't let a scratch bring down the look of your Ford Mustang.
This article applies to the Ford Mustang V6 and Mustang GT (1994-2014).
If the scratches on your 1994 to 2014 Ford Mustang V6 or 1994 to 2014 Ford Mustang GT are causing people to stare, or simply giving you reason to take pause each time you enter or exit your vehicle, there is a fast and simple way to repair the unsightly blemishes in one go. Best of all, you won't need to visit a local auto body repair shop to do it. Using a few simple materials, you can repair paint scratches on your hood, trunk or doors (to name a few common spots) in minutes. The results are long lasting and you spruce up any area of your Mustang as needed.

Materials Needed
- Repair kit with sandpaper
- Microfiber cloth or lint-free rag
- Car soap
- Bucket with water
- Painter's tape
Step 1 – Wash all contaminants from the paint
- Using a high-quality car soap, clean your paint thoroughly.
- You might need to complete two passes to ensure all hard-to-see contaminants, stubborn grime and old wax residue has been completely removed from the paint.
- Rinse your Mustang after each pass, and remember to clean the paint from the top down.
- It's recommended that you employ the two bucket-washing method, which is carefully explained in the video below.

Featured Video: How to Wash using the Two-Bucket Method
Step 2 – Choose which repair kit is right for you
When it comes to repair kits, you have two main options: Touch-up paint, which you would use if the scratch extends through to the paint, or a repair pen, which you would use if the scratch affects only the clear coat.
- Fill in the scratch with the repair kit you have chosen using a steady, balanced motion.
- Apply several coats.
- Allow the paint to cure, which, depending on the type of kit chosen, could be anywhere from several minutes to several days.

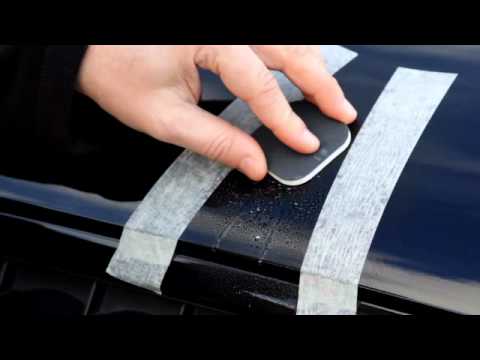
Step 3 – Section off the scratched area
- Creating a perimeter of approximately one inch above and one inch below the scratched area, apply several strips of freshly torn Painter's tape to your paint.
- This will mask off the scratched area while you work and prevent runoff, as well as contamination of your work area.

Step 4 – Wet sand the area
- For a clear coat scratch, it's recommended that you start with a lighter/more smoother grit sandpaper; 320-grit should suffice.
- For a deeper paint scratch, it's recommended that you start with a heavier grit sandpaper; 600 to 800-grit should suffice.
- Add a lubricate before you start sanding the scratched area, applying it liberally to both your paint and the wet sand pad.
- Go over the scratched area for up to 30 passes, adding additional lubrication as needed and using only light pressure.
- Switch to lighter grit sandpaper as you continue the wet sanding process.
Step 5 – Polish and wax the paint
- Apply a high-quality polish, such as one of the many varieties offered by Turtle Wax or Meguiar's.
- Rub the wax into the newly sanded and repaired area using a microfiber towel; it's only necessary to exert moderate pressure.
- Remove the polish once it starts to haze over using a fresh microfiber towel or a clean end of the one you currently using.
- Finish the job by rubbing in a liberal layer of wax using a light, circular motion.
- Remove the wax, and then buff the area to a high shine.

Related Discussion
- Repari Scratches - MustangForums.com