Ford Mustang V6 and GT 2010-2014: Getrag MT-82 Transmission Diagnostic Guide
The MT-82 is a fairly robust transmission capable of handling the horsepower and torque produced by the Coyote 5.0 V8. Like most transmissions on the market, it's not perfect. Thanks to support from the aftermarket, the factory, and the forum, these problems can be repaired and improved.
This article applies to the Ford Mustang V6 and GT (2010-2014).
The MT-82 uses a combination of helical gears, bearings, and shift forks to transfer the gear shifters movement into the transmission. When you shift, the clutch is disengaged by the release of the clutch disc against the flywheel. This removes engine torque from the transmission, allowing the synchronizers to slow the gears until a smooth shift can be achieved. The synchronizers are moved into position by the shift forks mounted on the shift rails.
All these components must be in proper working order to complete a shift. For example, a clutch that drags against the flywheel will generate excessive levels of torque as the synchronizers attempt to mesh with the gears. Begin diagnosing your transmission issue by first checking the easiest to access components.

Materials Needed
- Motorcraft Ford Dual clutch fluid for the MT-82
- DOT 4 brake fluid
- Rubber gloves
- Safety glasses
Ford has recognized several areas for improvement and made changes during the years, such as:
- (2011) Ford quits using Dual Clutch Fluid, due to excessive noise in the drivetrain. 75W-90 gear oil is now installed to reduce the noise. Shortly thereafter, Ford switches back to the original Dual Clutch Fluid because of hard shifting issues.
- In March 2011, Ford issues a TSB notifying current owners with the 75W-90 gear oil experiencing hard shifting issues can switch to the Dual Clutch Fluid.
- On July 1, 2011, Ford adds a phosphate coating to the surface of the MT-82 gears in efforts of reducing gear noise.
More information on various concerns investigated by the NHTSA regarding the MT-82 can be found here.
Step 1 – Begin diagnosing the concern
Record when the problem occurs during a test drive. Note whether the problem arises during a certain gear or engine load. Most transmission noises will stop or become much more quite when the vehicle is brought to a standstill.
Make sure your fully disengaging the clutch while driving. Slow your shifting speed down by disengaging the clutch (pedal down) before applying pressure to the gear shift.
Step 2 – Check the fluid level
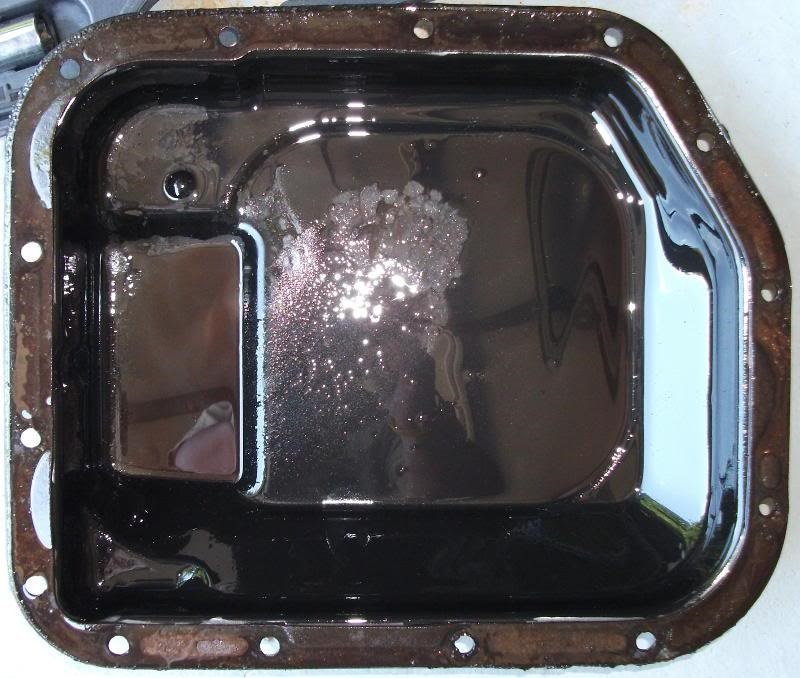
Ensure the fluid level is at the appropriate mark below the fill plug. Remove some of the fluid and analyze its color. The fluid should not appear dark/black in color. This is evidence of dirt contamination and possible fluid breakdown from high heat. If metal particles are found in the fluid, a full fluid flush and possibly a transmission tear down are advised, depending on how well the transmission is functioning for you.
Refer to the article How to Change Manual Transmission Fluid for 6-Speed.
Step 3 – Check the adjustment of the clutch
A mis-adjusted clutch or a clutch with excessive free play can create problems, such as hard shifting, grinding, or clashing noises. Lift the drive wheels (rear wheels) off the ground and place the transmission in first gear with the clutch pushed in. If the wheels spin with the clutch pushed in, then the input shaft is still spinning. Make sure your clutch pedal is not binding and has full travel to the floor.
If the input shaft is able to spin due to a clutch that will not fully disengage, the synchronizers cannot match speed between the gear and the output shaft.
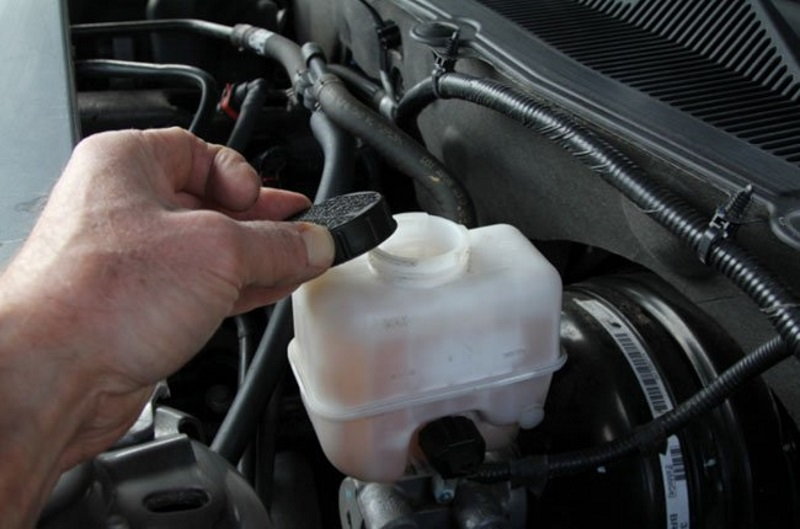
Make sure the master cylinder is filled with the correct fluid (DOT 3 or DOT 4 brake fluid) and both it as well as the slave cylinder have been bled of air. The clutch master cylinder and brake master cylinder share the same reservoir. The most common bleeding method is opening the reservoir cap and fully depressing the clutch pedal 10 times. If you have a vacuum bleeder, install the rubber stopper that fits into the reservoir cap opening. Apply a vacuum of 15 to 20 in. hg. for one minute. Release the vacuum and fill the system to MAX. Pump the clutch pedal ten times. Repeat the procedure until the clutch pedal effort is consistent.
A common upgrade that may improve your clutches engagement/disengagement is a stainless steel clutch line and a separate clutch master cylinder reservoir. The separate reservoir eliminates the risk of dirt from the braking system entering the clutch system. The line will keep the fluid cooler during spirited driving, resulting in fewer missed shifts.
Step 4 – Diagnose the cause of your transmission noise
There are many types of noises that can occur. By identifying the noise and at what times it occurs, you may be able to determine what's at fault before disassemble.
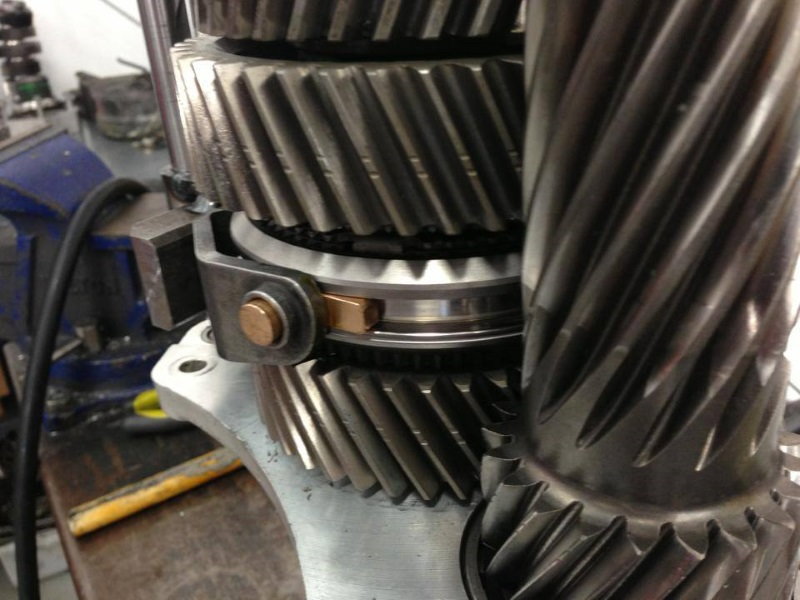
- Grinding Noise - Other than the clutch issues mentioned in Step 3, a grinding noise may be caused by a worn synchornizer blocker ring or a binding shift rail. This noise will occur while attempting to shift. A less common cause of grinding noises is a misaligned bell housing. When the bell housing is out of alignment, the clutch can drag and prevent the sychronizers from matching the speed of the gears' dog teeth.
- Growling Noise - If the noise occurs while driving down the road, it may be caused by by worn bearings or gears. These bearings may be located on the main shaft, countershaft, or input shaft. If the noise occurs in neutral with the clutch disengaged, it's likely the pilot bearing is worn. With the clutch engaged, a growling noise in neutral is indicative of a faulty input shaft front bearing or one of the counter shaft bearings.
- Clicking Noise - A clicking noise that occurs in any gear is most often caused by chipped gear teeth on the input shaft, main shaft, and counter shaft. The clicking will increase with speed or may change with gear shifts.
Step 5 – Diagnose the cause of your hard shifting
These are several reasons your transmission may exhibit hard shifting, other than the reasons described in Steps 3 and 4.
- The shift rails, synchronizers, and/or shift forks are binding. Try shifting the vehicle with the engine running and comparing the feel of the same shift with the engine off. There should be no difference if the synchonizers are working properly.
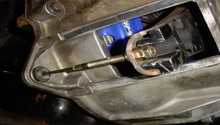
- The shift linkage is worn, the square portion of the shift lever is worn, and/or the detent system is sticking. This problem may be present if the transmission cannot shift into one or more gears.
- The gear dog teeth are worn. This will require transmission disassemble to inspect. The synchronizer sleeve will not mesh with the gear once the teeth are worn badly enough.
- If the transmission is stuck in one gear, there may be a stuck detent mechanism. A binding synchronizer or broken dog teeh may cause this, as well. Try disconnecting the shift linkage from the transmission. Is the shifter moving freely? If so, a shift cable may be frozen or the linkage could be binding.
- Check the shift linkage, shift cable, and shift boot if your transmission is popping out of gear. The shift boot will block the shifters travel if it becomes loose, especially as the engine is accelerated and decelerated. Worn engine and transmission mounts may create excessive levels of movement, resulting in the same issue.
The combination of a quality aftermarket shifter and an improved transmission bushing may correct your shifting issue. The stock bushing has been known to allow excessive levels of movement leading to gear lockout at high RPM's. Another benefit you obtain by installing the bushing is reduced drivetrain vibration.
Related Discussions
- MT82 Not Going Into 4th Gear, Making Noise - MustangForums.com
- The Truth About the MT82 - MustangForums.com
- MT82 Tranny Info - MustangForums.com