Ford Mustang V6 2005-2014: How to Replace Brake Fluid
Replacing the brake fluid on your Ford Mustang is important maintenance to ensure full braking power. Read on to learn how to do it yourself.
This article applies to the Ford Mustang V6 (2005-2014).
The average boiling point for your brake fluid drops after a while, which causes a huge change in braking performance. Even though it's not always noticeable, it is important to change your brake fluid every 15,000 to 30,000 miles. Replacing the brake fluid is a great way to get rid of all the moist contaminants and air out of the system. It's important that you bleed the brake system after such a procedure, because the braking system is a pressurized system, which means any air altering it will directly affect the feel and power of it. Learn how to replace the brake fluid and bleed the system in the Ford Mustang V6 here.

Materials Needed
- Jack and jack stands
- Tire iron
- Wrench 3/8
- Clear hose
- Bottle
- Turkey baster
- New brake fluid
Step 1 – Siphon old brake fluid
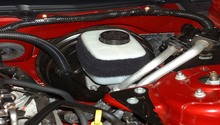
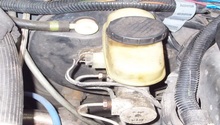
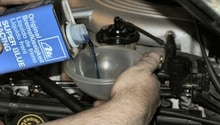
Open your hood and locate the brake fluid reservoir/master cylinder. Using your turkey baster, siphon out the old brake fluid. Pay attention and put a rag under you because brake fluid is corrosive to the paint.

Step 2 – Add new brake fluid
With the brake reservoir's cap off, add your new brake fluid until you reach the max line.

Step 3 – Bleed brakes
Bleeding the brakes after replacing the brake fluid is a must, because you've introduced air into the system. You will need to bleed the calipers on each wheel, so jack the car up, set it on stands and remove all four wheels.
(Related Article: How to Jack Up Your Mustang - Mustangforums.com)
The sequence of the brake bleeding is: Right-rear, left-rear, right-front, and left-front. The goal is to start at the point farthest from the brake master cylinder and work your way towards it.
Locate the caliper's bleeding valve on the back of it, and connect the clear hose to it. Connect the other end of the hose to a bottle, and ask a friend to pump the brake pedal a few times and then hold the pedal down. As they are holding the pedal down, crack open the bleed valve on the back of the caliper. Brake fluid will begin to flow out of the caliper. After a few seconds, close the valve. From here, repeat the process of pumping the pedal, holding it down and opening and closing the bleed valve to remove old fluid. Do this until clean, new fluid comes out and there are no air bubbles visible in the clear tubing.
Be sure to top off the brake reservoir with brake fluid between each wheel; if it gets too low, you will introduce air into the system and have to start all over.
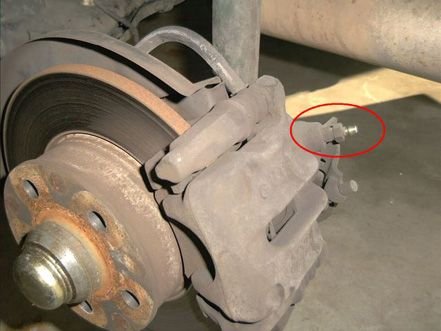
Figure 3. Bleeder valve. 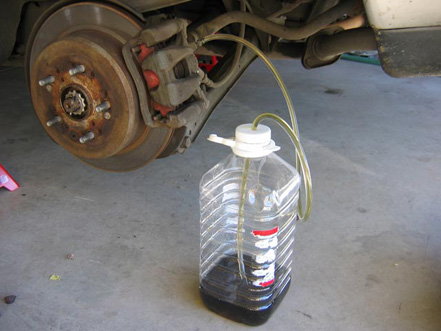
Figure 4. Bleed until you see fresh, clean fluid.
Step 4 – Top off master cylinder
When you're done with bleeding all four calipers, check your master cylinder's level and top it off as necessary. Watch your brake fluid's level over the next few drives.

Related Discussions
- How to Change Brake Fluid - MustangForums.com
- Replacing Brake Fluid - MustangForums.com